How To: Build A Sand/Water Table for Under $30!
Sorry this took me so long to blog, but I had to have a tool list and full instructions before I could do so.
A little history on my love for the sand/water table. I love the idea behind tools for tiny hands, i.e. the Montessori Method, and like to have Lukka 'figure things out for himself', even when he is playing. I try to have the most simple and basic toys available for 3 reasons: a) simple toys generally have less parts, which means less of a hassle for me
b) simple toys inspire way more creativity and imagination than do 'exact replica' toys
c) they are much more aesthetically pleasing to look at, therefore, not making every nook and cranny of our house an eyesore!
I know the last reason is just for me, but it's true. Plastic things don't generally last 1/2 as long as wooden or fabric toys, and they are unattractive. For this reason, I started to look for a wooden sand/water table as opposed to a plastic one and all I could find were ones for hundreds of dollars, although beautiful! Keep reading for pictures and complete directions.
Disclaimer: If you aren't good with a hammer and saw, pass this project on to someone who is, I drew out the plans for my husband, but he was the one who went to work on it and finished it. This may just have to go to the Honey-Do list!
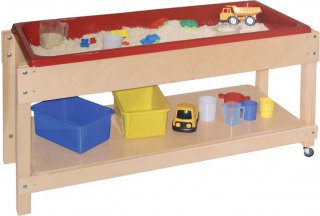
*The Final Product*
Lukka exploring the sand/water table for the first time...he loves it!Sorry this took me so long to blog, but I had to have a tool list and full instructions before I could do so.
A little history on my love for the sand/water table. I love the idea behind tools for tiny hands, i.e. the Montessori Method, and like to have Lukka 'figure things out for himself', even when he is playing. I try to have the most simple and basic toys available for 3 reasons: a) simple toys generally have less parts, which means less of a hassle for me
b) simple toys inspire way more creativity and imagination than do 'exact replica' toys
c) they are much more aesthetically pleasing to look at, therefore, not making every nook and cranny of our house an eyesore!
I know the last reason is just for me, but it's true. Plastic things don't generally last 1/2 as long as wooden or fabric toys, and they are unattractive. For this reason, I started to look for a wooden sand/water table as opposed to a plastic one and all I could find were ones for hundreds of dollars, although beautiful! Keep reading for pictures and complete directions.
Disclaimer: If you aren't good with a hammer and saw, pass this project on to someone who is, I drew out the plans for my husband, but he was the one who went to work on it and finished it. This may just have to go to the Honey-Do list!
*The Final Product*
Sharpie Marker
2 LIDDED tubs, child-size appropriate
hammer
skill-saw
1 8-foot 4X4
2 8-foot 2X4
1 24inch (") X 32 inch (") plywood (1/2 " thick)
.25 lb box of 8-penny nails
.25 lb box of 16-penny nails(these both normally come in 1 lb boxes, but you'll only need to use 1/4 of the box of each, OR you can use what you have at home!)
Cutting:
Cut 4X4 into 2 ft segments (you will have 4 of these and they are the legs)
cut 2 2-foot 2X4
cut 2 17" 2X4(width of table--base box)
cut 2 25" 2X4(length of table--base box)
cut 2 35" 2X4(length of table)
Directions:
On top of plywood, trace around the tubs with the sharpie, making sure you are tracing the BODY of the tub, not the lid-the tub will sit perfectly inside the table while the rim of the tub 'holds' it in place. See our last picture)
Cut out 2 shaped squares with skill saw.
Take 17" and 25" 2X4s and nail them flush with the posts (4X4s), creating an 'topless' table. Flush means they do not go above the posts, but are completely level with them.
Nail plywood (with shapes cut out!) onto the top, creating a flat table.
Take remaining boards and nail them to the side of the table, making sure they are sitting 1 & 3/4 inches above plywood, creating a ridge (so the sand can't escape easily!).
Insert tubs into "holes" on the table top, leaving one empty for water, filling the other with sand.Enjoy with the tools of your choosing!
All of these tools (assuming you have a hammer and a skill saw) cost under $30, including the tools we found in the $1 section of Super Target! Have fun for less!
*Note*
Our table top is gray because of a laminate we had, it was originally used as a home-made desk in an office, but we found a way to recycle it and it works perfect. This is a great option if you're worried about slivers against plywood. The laminate can be found at a hardware store like Home Depot.
**update March 2014** About a year ago we lost the digital photos dating back to this time due to a computer issue with picasa. We will upload them from our previous hard drive at our earliest convenience. Here is a photo via pinterest what the sand/water table (this photo is ours). The sand/water table was used for years until we moved across the country and gladly gave it to a friend of ours who has 4 children. They are now using it! It was a great investment and project, and we hope these directions help you. The kids in your life will love it. Best wishes.

Comments
Lukka will be the envy of the neighborhood!
--updated March 2014
If you are screaming out “water table,” you’ve come to the most elite essay water table.... Click here